Form Design - Object Properties - Edit Event
The On Click property of an object allows you to specify an action that occurs when you click on the object. For example, you may wish to create a text label that functions as a hyperlink, or a button that clears Argos variables. The On Click property can be used with buttons, labels, shapes, images, and charts.
The following table describes the available actions that you can assign with the On Click property:
| Event | Description | Properties |
|---|---|---|
| Activate Form | Display another form in the form list. |
Form Name - select the form you would like to activate. |
| Clear Variables | Clears some or all of the variables in the DataBlock. |
Scope - select which variables you would like to clear.
|
| Fetch File | Prompts the user to open or save a file from the MAP server or a network location. |
File name - enter the path and name of the file.
Note: Your MAPS administrator must add this path to the File Operations screen in the MAPS Configuration and then select the option to give read access. |
| Hyperlink | Turns the object into a hyperlink that users can click to launch a URL. |
URL - enter the text of the URL you would like to link to. If desired, you can use the Expression Builder to form the URL. This allows you to include variables in the URL string. For URLs that include parameters, use the EncodeURI or EncodeURIComponent functions in the Expression Builder to build a URL string that properly encodes special characters. Note: Make sure to change the Cursor property of this object to HandPoint so that users know it is a clickable link. For text links (labels), you may also wish to use a blue underlined font. See Form Design - Object Properties for more information. |
| Refresh Variables | Refreshes some or all of the variables in the DataBlock. Refreshing is commonly used to update the values of SQL variables in cases where the underlying data may change while the dashboard is open. |
Scope - select which variables you would like to refresh.
|
| Reset Variables | Resets variables back to the values they have when the dashboard first opens. |
Scope - select which variables you would like to refresh.
|
| Set Variable | Sets the variable to a specific value. |
Variable - select the name of the variable to set. Value - enter the value to give this variable when the object is clicked. Note: This option only works with manual variables. You cannot set a manual value for a SQL variable. |
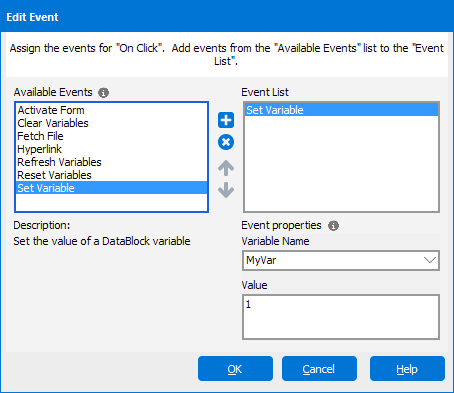
Click the text area of the On Click property to bring up the event editor:

Tip: When using the On Click property, it is helpful to also set the Cursor property of the object to HandPoint so that users know the object is clickable.
For more information, see Form Design - Object Properties.
To add an event, select the event you want from the Available list and click the blue arrow button to add it to the Event list. Next, enter the properties for the event using the drop down or text entry fields below.
You can add as many events as you want to this object. When the user clicks the object, all of the objects in the list will execute from top to bottom. If needed, use the up and down arrows to rearrange events so they occur in the desired order.
If you need additional help creating DataBlocks, see Getting Started with DataBlocks.